Wednesday, November 28, 2012

December Daily- We are Ready to Rock

Over the last few weeks I have been working on setting up my December Daily Album for this year. I've already shown you my Foundation pages, and the first Draft of my cover. Now it's time to dig into the fun stuff I have put inside! I've also got some pictures of the supplies I have gathered to use throughout the month, and a fun idea for getting the whole Family involved in December Daily.

I apologize in advance for the less than stellar pictures. I am still trying to figure out the best settings on the camera I own, and my computer with my editing software is being buggy today, so these are SOOC (or Straight out of camera for you folks who don't deal with camera terminology).

Let's start off with my updated cover. I added a glue rub-on tree which I then glittered. I added some rhinestones for ornaments, and a chipboard star for the top. I also altered the back a little, just extended the washi tape to cover the entire spine on the back. I failed to get a picture of it though. My boys are loving looking through it already and are super excited to get started this weekend!
I gathered a bunch of supplies together to make the recording and embellishing more easy. These are going to be set on my kitchen counter near the table so I can quickly get some recording done without pulling out any additional supplies. The red utensil container has a few ink pads, a couple smash stamps, 9 rolls of washi tape, several adhesives, rhinestones, glitter, a rub-on applicator, and various pens.

I also gathered together stickers, journaling cards, die-cuts, rub-ons, envelopes, extra page protectors, etc. These I put in a cute tin I found at Ikea, I put little cards in that separate each catagorey for easy access.I also have a small paper cutter and a 3-hole punch that I have adjusted to punch holes that fit in the album.

Now on to some of the things I have already added. I love adding in all kinds of memorabilia from throughout the month, but some things come from earlier and fit with what I want in my album, so I include those too!

I took one of our Christmas Cards and cut it in half (removed the back) I then punched it with my hole punch and insrted it into the album. On the other side of it there was a big blank space so I added a little die cut that says 'Seasons Greetings" and a handwritten note that says "Our Christmas Card". Looking back I wish I had picked a Christmas card that was horizontal rather than vertical so it would have looked better in the album. Oh well, there is always next year!

The other thing I have put in is Ryan's "Letter to Santa" He drew a picture of what he says is "Lego guys", because that is what he wants for Christmas. if only I had known that BEFORE I finished my Christmas shopping for him. Jack had one as well, but he spilt milk on it, so I am going to have him do another one later this month.

 Now on to the fun stuff!! This is mostly just for looking at, so I won't talk to much about them. If you have a question leave it in the comments and I will try to answer it. These first pictures are all of dividers I made for throughout the album.

And then there are some fun little inserts. There are more of these, but I only photographed a few. Many of them are on the backs of envelopes, so there will be little pockets to put things in throughout the album.
I also have a little notebook that my Mother-in-law sent me a few months back that I am going to keep with me while we are out and about throughout December so I can jot down anything that I want to remember to put in the album.

You'll notice I didn't put any numbers on my pages. I want t be able to move the little inserts around wherever they fit best. The foundation pages I have each have the date, and i have some numbers I have cut to add if I feel like it.

So there you have it, all the basic elements of my December Daily Album for 2012! I think this is the most on the ball with this I have been in a while! So proud I have gotten this far with it!

To make this project more of a family affair I have made a fun list of random things to take pictures of throughout December. It's about 100 items long, so there are some pretty obscure things in there! Every day each family member has to take a picture of at least one thing on the list. I purchased a cheap digital camera for my boys to use (It was free! Just had to pay $2 for shipping! Score!). I imported the list into my "Cozi" App on my new smartphone so that we can check things off the list wherever we may be. Not all the pictures will make it int the album, but some will, and it will be a fun was to get the whole family involved in the project!

Monday, November 26, 2012

One Little Word: What Will You Focus on in 2013?

It's about that time of year that I start thinking about my "One Little Word". This is a word that gives me a focus for the upcoming year, something to work on, think about, develop, etc. I got the idea from, you guessed it, Ali Edwards (have I mentioned how much she inspires me in everything she does?), and it has been interesting.
My word last year I believe was "Create". I don't remember exactly. I lost track of what I wanted to focus on this year at some point, as I focused on meeting the needs of everyone else. I think I created, but I didn't really focus on creating myself. I meant to create in many different meanings of the word, and it all got lost because I put myself last. I wanted to create an organized home, I wanted to create traditions, I wanted to create memories, and mostly I ended up creating stress.
This last little part of the year I am going to try to focus on creating more, and one of the things I want to create while I do that is something visual I can put up in my house to remind me of the word I choose for 2013.

That leaves me the task of deciding on a word. In the past this has been a hard fought battle. I probably over-think it, but it always seems like such a big thing to me. I think about it a lot. I even pray about it. I ponder the year ahead and what I know I will be facing. I think about other goals I have set, and how I might incorporate them into my one little word. I think of it as an affirmation, or a resolution. It defines me, and focuses me, and feels like something that should be given great thought and consideration.

Some that are in consideration for this next year: Create (again, so I can do it right this time), Memories, Me, Achieve, Be, Challenge, Cultivate (that was on my list of maybe's last year), Focus, Record, Lift, Moment, Restore, Venture, Wonder... and the list goes on. It's going to be hard to choose one.

So, if you could choose one word that represents what you want for the coming year, what would it be? What one little word will define you this coming year? Think about it, and post your answer below. Perhaps you will inspire me... ooooo Inspire is a good word too....

Tuesday, November 20, 2012

DIY Graphic Christmas Canvases

Today I want to talk about these cute little canvases I made yesterday. They are so simple, easy, and cheap! I'm going with a color scheme of red, green, gold, silver, and glittery this year for our decor, and they make such lovely additions!

Here's what you need:


2 Canvases- One 12x12, One 8.5 x 11 (I love the bulk value canvases at Micheal's)
Red glitter Chipboard letters ( I used these)
1 chipboard Ampersand in a contrasting color
1 flat glittery ornament (I found mine at Dollar Tree)
Hot Glue Gun and Glue Sticks


1. Decide on what two phrases/word you would like on your canvases, make sure you have enough of every letter you need (I forgot this step and ended up having to turn another letter into an "r" to finish merry & bright). I suggest one long one, and one short. For example Love & Joy + Noel, Jingle Bells & Snow, etc. You will likely have enough letters left to make a few more words (I am going to make a Santa and Snow one as soon as I can get out to Dollar tree for more ornaments).

2. Arrange the letters on the two canvases to your liking. I found it helped me to draw a light pencil line to line up my letters. Remember to leave space for your ornament on one of the canvases.

3. Once you have you letters arranged how you would like remove one at a time, place hot glue on the back and replace it in the same position. Do the same with your ornament. Allow to dry. Erase any pencil marks that may be on your canvases.


It's really that simple! it took me less than 5 minutes to do both of mine, and I love them. They are so graphic and simple! And I already had all the items I needed on hand, other than the ornament. I can't wait to do the other two!

Monday, November 19, 2012

Menu Monday: Week Three

Yay! We are back to Monday again, and another installment of Menu Monday!
So what's on the menu at the Ford's house this week? Lots of warm comforting food, with quite a few seasonal yummies thrown in.

Black & White Vegetarian Chili

This link is a three for one! There are three Chili recipes contained here, and all of them are super easy. We have made the curry chili and the pumpkin chili before (and I even combined the two recipes for an even more delicious result!), but this time I chose the Black and White Chili, just to shake things up. So far the pumpkin Chili is my favorite, but we'll see if that changes!

Tomato, Herb, and Goat Cheese Frittata

This recipe hails from my newest favorite recipe blog Naturally Ella. She is my kind of cook! She uses natural, wholesome, in-season produce in here recipes. This one is from October, and uses the last of her yummy tomatoes, so not in season anymore, but still delicious! And thanks to my handy, dandy, anniversary gift I am now able to make Frittatas! Yum Yum Yum! I have a very big love for cheese of all kind, but goat cheese has to be one of my favorite to cook with. It is so tangy and creamy, and works well with so many kinds of food! Don't be afraid to try it, it is delicious!


Roasted Butternut Squash, Caramelized Onion, and Goat Cheese Tart

 Now that you know of my obsession with cheese it will come at no surprise that this recipe contains three cheeses! Add in the deliciousness of butternut squash (a staple around here during the winter months), and delectable caramelized onions and there was no way this one was not making it on the menu this week. Bonus is I still have some butternut squash leftover from last weeks Lasagna, so I don't have to carry home a heavy squash!

Roasted Curried Tomatoes with Fried Paneer and Rice

Another lovely recipe from Naturally Ella. This is a lighter take on Indian Food, and seemed like just the right thing to round out my menu. With fresh paneer it should be amazing! I love that I can make Indian food more affordable and accessible now that I can make my own paneer. Learning to make Paneer, Mozzarella, and Ricotta cheeses has really changed the way I look at recipes. I see those ingredients as a gallon of milk, and boy does that make it seem more doable on a budget! Now if only I could learn to make Goat Cheese and find goats milk locally.

Black Bean and Sweet Potato Soup with Lime

Our last recipe hails from Kalyn's Kitchen. With the cold weather I can't help but throw in more soups into our menu. I love soup, and I am trying to convert my husband to loving soup and chili. So far I have found one soup and one chili he actually likes. This recipe mainly made it on here because I have two extra cans of Black beans in my pantry, and a large sweet potato that has to be used. That makes this soup a budget helper, as all I have to pick up are some limes! Score! I always love finding recipes that use what I have on hand!

Wednesday, November 14, 2012

Sweater Pillow DIY


A few days ago a sad thing happened. My very favorite sweater (and pretty much my only sweater at this point) decided to get a teeny tiny hold in it. Normally I would keep wearing it, but this hole happened to be right in the chest area, and showed my wonderful purple bra off to the world (I only have one bra right now too, boy do I need to go shopping!). I love this sweater, mostly because it is 3/4 sleeve. I genuinely hate long sleeves, and always roll them up, so this saves me a step! After much sadness I decided the sweater could no longer be worn and decided to throw it out.
Before I had even gotten it over my head I decided that it might be perfectly useable in some other way, and my mind decided that it should be made into a comfy cozy pillow cover so I can keep feeling it's warmth.

A few days later I tracked down some thread, a needle, and some scissors and went to work. I cut all the way across the sweater just under the arm pits so I had a tube top like thing. I also cut off the sleeves for use in a let project. Not sure what yet, but we will figure something out! I then turned it inside out and hand stitched the entirety of one side.
This would probably have gone faster if I had used my machine, but my white bobbin was missing and I did not have an empty one. So I sat and stitched while enjoying a nice glass of water and watching an episode of Pretty Little Liars.
I then turned it right side out, inserted the pillow, and carefully hand stitched all along the other side of the pillow.
It took about an hour altogether, but now I have a soft warm pillow perfect for the Holidays and cold weather.
Since it went so well, I grabbed a pillow whose cover had gone missing, and some green damask pattern fabric I had bought for Halloween and made up another little pillow.
They now both grace my favorite little red chair from Ikea (which needs a cleaning badly!). I imagine it will be the perfect little spot for sipping some Hot Cocoa this holiday season as I admire my Christmas tree and wait for my husband to get home late at night. It sure put me in a holiday mood, so I got out a garland that never made it into the Christmas storage and put it up as well. So now my house is slowly on it's transformation to a Holiday haven.


So What Do you think I should do with the Sleeves? I am thinking either some type of vase cover, or making them into rice bags. Any other suggestions out there?

Monday, November 12, 2012

Menu Monday: Week Two

It's been a long week around here. I got super busy putting in some projects for a Design Team call and neglected my blog mid-week last week. I thought of posting on the weekend, but with all the snow we received it made our errands more difficult and draining than usual and I just didn't find the time.


SO let's get a fresh start this morning! On to this weeks Menu monday! This one is brought to you by my husband who volunteered to menu plan this week.

Tofu Makhani

At our house Indian Food is comfort food. It's aromas fill our house on many occasions because we love it so much! This particular recipe is an easy one to get your feet wet with. The only ingredient I have had a hard time finding is the Fenegrek Leaves, and you can find those online on Amazon for a decent price. This is the ultimate in sweet and savory, deliciousness. It is even better with paneer, so if you have some on hand, or are lucky enough to know how to make it I suggest going that route. Perhaps there will be a tutorial on making paneer in the near future.


Adult Grilled Cheese

We made our own variation on this lovely sandwich. Ours contained Sharp white Cheddar instead of fresh mozzarella (though if I had had the time we would have made some fresh mozzarella, that stuff is amazing!!), and thinly sliced tomatoes instead of the pepperoni. Served on sourdough bread with some tomato soup these were a perfect choice for a cold snowy day!


Black Bean and Guac Burritos

These beauties come from the blog Naturally Ella. I just discovered this blog, but the multitude of delicious recipes means I will likely be making some more of her wonderful food. Obviously my husband was in an Avocado mood this week as he chose recipes! I won't complain, I love the little green fruits! And with the large ones on sale for .80 each this week I am thrilled!


Butternut Squash Lasagna

This is the most addictive lasagna I have ever had! No delicious you won't even notice that there aren't ANY of the traditional lasagna elements in it (except lasagna noodles of course!) The butternut squash is the perfect fall filling for lasagna, and when paired with yummy fresh basil the depth of flavors in this one are amazing. If you only try on recipe I post ever this is the one I suggest. You will not regret it. Thank you Batter Licker for a wonderful family favorite! 


Pizza Puffs 

Last but not least, a sure hit with the kids, Pizza puffs from Lick the Bowl Good. I don't know about you, but anything that is snack sized gets a great review with my kids. They love food made on their scale! And if you give them something to dip it in than you have a sure fire winner! These will be made at my house this week, with the adaptation of mushrooms instead off pepperoni (though I am sure my kids would eat the pepperoni up!) I suspect I will be hailed as the greatest mommy ever on the night these are served, and that much pasta sauce will end up all over my children.


So there you have it! Some menu Inspiration for this week! Let me know if you try any of them, and what you think!

Tuesday, November 6, 2012

December Daily- Foundation Pages

I am so excited for my December Daily this year! I feel like this is going to be the year that I finally catch on and get it working for me. It's only November 6th and I already have my foundation pages printed, cut, mostly embellished, and sitting inside my album waiting for the wonderful stories that will fill them come December.
I had decided when I took on this project this year that I was going to go for a more simple approach than I have in years past, as I think I get too caught up in the making it perfect and never finish it. I opted for a smaller size album of 5x7 for that reason; less space means less embellishments, less embellishment means simplicity, simplicity means SUCCESS.
I hadn't entirely decided on what my foundation pages would look like until yesterday when Ali Edwards posted her foundation pages for the year. I was instantly drawn to them and knew I had to duplicate it. It was just the simplicity I was looking for. You can see an example of it to the right, isn't it so simple and beautiful? Love, Love, Love it. You can check out more of her foundation pages here.

So off I went to create my own similar design to fit my 5x7 album. After a few hours of painstakingly playing around in Illustrator (my computer is on it's last legs and is VERY slow when I am working on graphic intensive projects), I came up with this:

I am pretty happy with the way it turned out. I wanted to have them all be on the bottom (Ali varied hers a little more), which made it easier for me. I then printed them off and set to work using the crop marks to cut them down to size. I then added some washi tape to many of the pages. Getting my inspiration once again from Ali.

 I love these beautiful Washi tapes from Downtown Tape. They are so wonderful and versatile. If I got a stocking full of washi tape this year I think I would be one happy girl!

Again, the pages are super simple, the top space will either house a photo, or some journaling, or embellishments, or memorabilia from each day, likely a bit of all of it. I am so happy that I have it close to finished for December!

Now here is a fun chance for anyone who is reading! I've got some leftover supplies for these foundation pages, enough to make a set for one of you! If you are interested in participating in December Daily this year this is a great way to get started!
So what do you have to do to win it? Enter using the rafflecopter form below.
a Rafflecopter giveaway

Monday, November 5, 2012

Menu Monday- Week One

Sometimes it is easy to get stuck in a food rut around our house, making the same things over and over again. We have our favorites around here, and often we fail to branch out from them.
In an effort to get a more varied menu going in our house I am going to start sharing 5 recipes every Monday that we are trying at our house this week! Hopefully it will help you branch out too and try new things!
So without further ado let's start off this week's Menu Monday round-up!


Roasted Red Pepper Soup With Roasted Chickpeas
This recipe hails from the blog Edible Perspective. It caught my eye with it's lovely red-ish orange color. Just looks divine! Fall is a time for soup in my opinion, so I like to have at least one soup recipe planned a week (despite my husband pretty much hating soup... silly husband!) We will probably serve it with some bread maker bread. Yum yum! Or maybe a Grilled Cheese Sandwich. Now that sounds good!


Stir-Fried Tofu with Scallions, Garlic, Ginger, and Soy Sauce
A week's menu at our house would not be complete without a Tofu recipe. I know, you must be thinking "How the heck does she get her children to eat tofu?!". The answer is, my children beg for tofu, it is their favorite food. Yes, you heard right. My 5 year old and three year old both love tofu. This recipe from Kalyn's Kitchen looked amazing today, so on the menu it goes!


Gina's Creamy Mushroom Lasagna
Another much loved ingredient that hardly a week goes by without it ending up in our food is Mushrooms. When I saw mushrooms mixed with another favorite around here, lasagna, I knew this had to be on this weeks menu. Crazy me even plans to make her own ricotta for it! Have I ever mentioned I make some of my own cheese? I've got Paneer and Fresh Mozzarella under my belt already, so Ricotta should be a breeze, right? This lovely recipe comes from AllRecipes.com


This amazing looking concoction comes from Sweet Happy Life. The reason it landed on my menu this week? It's a crockpot recipe, which can be a lifesaver on a day when I have a lot to do. This may end up being a Friday recipe, so I can make my Husband do it before he goes to work (Yes, I make my husband cook occasionally, mostly on weekends). I love that it uses mostly stuff I have on hand, but I will be skipping the homemade sauce just for convenience.


 Roasted Veggie and Black Bean Burritos
These are a favorite around here, despite my husband professing he doesn't like sweet potatoes. I found this recipe on Tasty Kitchen, which has become one of my favorite places to find recipes. In an average week we usually find two recipes from that site on our list. These are quite delicious, and pretty easy. They give me that sweet and savory combo that I am a sucker for.


Well there you have it folks! That's what is on the table at our house this week! They will be supplemented with a dinner out (Rumbi's is giving away free meals this week if you bring in two cans of food for the food bank! Good for the community, and good for your wallet!), and a quick prepare recipe. All of these recipes are vegetarian, and the top two are vegan. If you try any of these recipes let me know, and leave a review on the websites they came from! I'd love to see what you think!

Friday, November 2, 2012

Hero Up: Superhero Sign Tutorial

Sorry for the hiatus yesterday. My husband skipped school for the afternoon, so I was busy coming up with a few awesome projects to work on for a submission for a design team call.
 A few of the projects were ones I already had  in my head for other purposes, one being my boys superhero room. They have been asking to have a Superhero room for several months now, and my head has been spinning with a bunch of ideas on how to do it. I am not a huge fan of the Character sets you can buy, so I am trying to craft their room around primary colors, with a really graphic retro look.

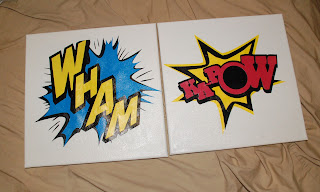
The first project I worked on for their room is a pair of Superhero automotopia signs that say "Ka-pow" and "Wham". These were pretty easy, and they turned out so good that I wanted to share how I made them with you!

Materials Needed
  • 2- 12 x 12 canvases 
  • Mod Podge 
  • Foam Brush
  • 5- 8.5 x 11 Sheets Black Cardstock
  • 3- 8.5 x 11 Sheets Yellow Cardstock
  • 2- 8.5 x 11 Sheets Blue Cardstock 
  • 1- 8.5 x 11 Sheet Red Cardstock 
  • Silhouette Machine
  • Ka-Pow cut shape
  • Wham cut shape

  • First thing you need to do is open up the cut shapes in the silhouette. They are sized to fit an 8.5 X 11 sheet, but  we want to make the bigger. Un-group the shapes (Ctrl+U) and layer them on top of each other so you have it made into the final shape. It helps to fill each piece with the color you will be cutting it from. It should look something like the picture to the right. Now re-group the layers (Ctrl+G), and re-size the group so that the largest side is 11 inches. Make sure you have "lock aspect ratio" selected so you don't get it stretched strangely. 


  • Next we are going to un-group them again (Ctrl+U) and separate them. If you have a Silhouette Cameo you can just cut each layer as is. I have a silhouette SD, so I have to cut up the pieces so they will fit in my cutting area. Start with the bottom layer (Yellow on Ka-pow, or Black on Wham), and center it in the cut area. Then take you knife tool and slice down the center of your image. Repeat on all layers you cannot fit in the 8.5 x 11 space. It should look similar to the picture to the right. You will end up with five peices for the "Kapow" and six pieces for the "Wham". 
  • Cut each piece from the appropriate color cardstock.
  • Starting from the bottom layers, assemble and Mod Podge each layer on to a 12 x 12 canvas in order. Make sure you use plenty of Mod Podge! One all layers are added on Mod Podge the entire surface, or spray with an acrylic spray to keep your masterpiece in place. Let dry thoroughly.
  • Hand them to your children and let them pretend to be superheros before you hang them (the pictures, not the kids!) on the wall.
There you have it! Super cute Superhero art work for your kids room! I would estimate that the pair of signs cost me about $5 to make. That is a super deal! :)


When the boys room is all done I will make sure to give you guys a tour! There will be lots of DIY and re-purposing  going on. Some of the currently planned projects are a superhero mod podged table, a superhero tea set, and a superhero dress-up station! Stay tuned for the details!